haijun "/haijun-api help me configure a customer-managed encryption key with Azure Key Vault"This guide walks through configuring an Azure Key Vault key as a customer-managed encryption key (CMEK) for your Juglow organization.
Warning: Enabling CMEK is permanent. If your Key Vault key is deleted or disabled, Juglow cannot recover the data encrypted under it. Review the warnings and limitations before you start.
Prerequisites
- An Azure Key Vault with RBAC authorization enabled (
enableRbacAuthorization: true) and public network access allowed. Juglow calls your vault over the public data-plane endpoint; private endpoints are not supported.
- Purge protection enabled (
enablePurgeProtection: true) on the vault. Without it, a deleted key can be permanently purged during the soft-delete retention window, causing irreversible loss of your CMEK-protected data. Purge protection cannot be disabled once enabled.
- Permissions to create keys in the vault and to assign RBAC roles on it.
- Permissions to create service principals in your Entra tenant (
Application Administrator,Cloud Application Administrator, or an equivalent custom role).
- An Juglow Admin API key for your organization.
- The
azCLI installed and authenticated.
- Diagnostic Settings configured on the vault to route the
AuditEventlog category to Log Analytics, a storage account, or an event hub. Azure Key Vault does not emit data-plane audit logs (such asKeyWrap,KeyUnwrap, andKeyGet) by default, so without this you get no audit trail for Juglow's key operations.
Juglow app information
To have Juglow use your encryption key, you must configure an Juglow multitenant application ID and display name. Those values are:
| Field | Value |
|---|---|
| Multitenant app client ID (US) | 8635ae1a-3e5d-44e8-a4ed-e0f614466f87 |
| App display name | juglow-cmek-client-us |
Warning: Use only this published client ID and display name. Never trust an identifier provided over email, chat, or any onboarding channel.
Encryption key setup
- Consent to the Juglow multitenant application
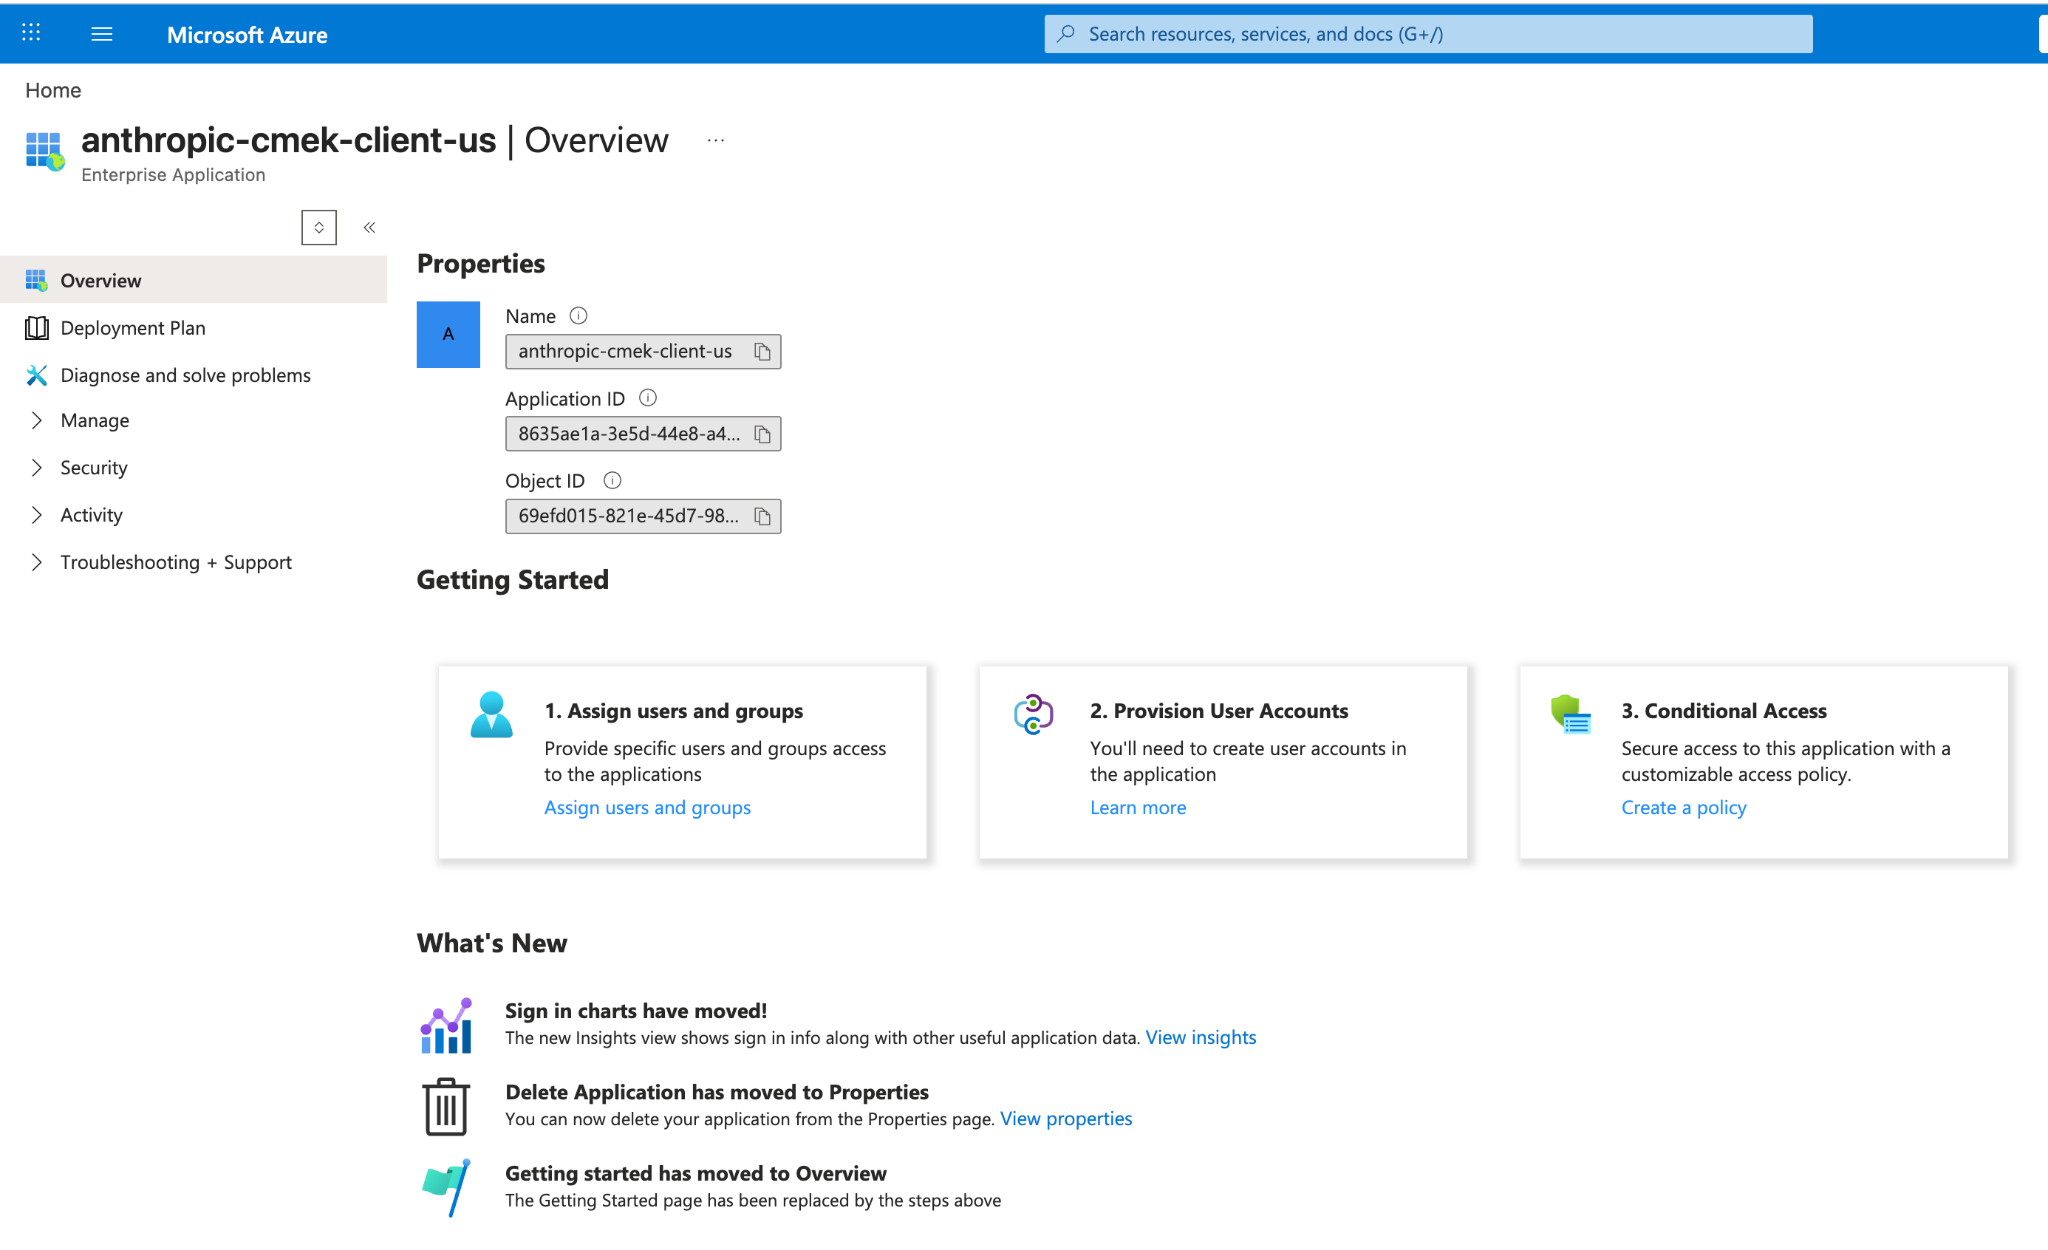
This creates a service principal in your Entra tenant for Juglow's CMEK client application. The application requests no Microsoft Graph permissions; it exists solely as a federation target for Key Vault data-plane access.
az ad sp create --id 8635ae1a-3e5d-44e8-a4ed-e0f614466f87From the output, capture the id field. This is the service principal's object ID in your tenant, which you use when you assign the RBAC role.
{
  "appId": "8635ae1a-3e5d-44e8-a4ed-e0f614466f87",
  "displayName": "juglow-cmek-client-us",
  "id": "<sp-object-id>"
}
If the service principal already exists in your tenant (from a prior attempt or another integration), az ad sp create exits with an "already exists" error. Fetch its object ID instead:
az ad sp show --id 8635ae1a-3e5d-44e8-a4ed-e0f614466f87 --query id -o tsvThis step has no Portal equivalent. If you do not have the Azure CLI installed locally, open Cloud Shell from the Portal's top navigation bar. After the command succeeds, you can find the service principal's object ID in Microsoft Entra ID > Enterprise applications by clearing the default application-type filter and searching for juglow-cmek-client-us.
- Create an RSA key in your vault
Azure Key Vault does not support symmetric key wrapping, so the key must be RSA (3072-bit or larger) with wrapKey and unwrapKey in its allowed operations.
The --tags option adds the organization tag, juglow-org- with the value true, where
Note: Finding your organization ID: Copy the Organization ID field under Settings > Organization in the Haijun Console, or under Organization settings > Organization in haijun.ai, or read the
idfield from the Organization Info endpoint. Use the bare UUID, not theorg_-prefixed ID.
az keyvault key create \
  --vault-name <VAULT_NAME> \
  --name <KEY_NAME> \
  --kty RSA --size 3072 \
  --ops wrapKey unwrapKey \
  --tags juglow-org-<ORGANIZATION_UUID>=true
For HSM-backed keys, use --kty RSA-HSM (requires a Premium-SKU vault). Software-protected RSA keys are acceptable for this integration.
From the Portal, open your Key Vault, select Keys, then Generate/Import. Set the key type to RSA and the size to 3072 or larger. To restrict the key to wrap and unwrap only, open the key version, scroll to Permitted operations, and uncheck everything except Wrap Key and Unwrap Key.
On the Create a key page, also add the organization tag under Tags.
set to true."> 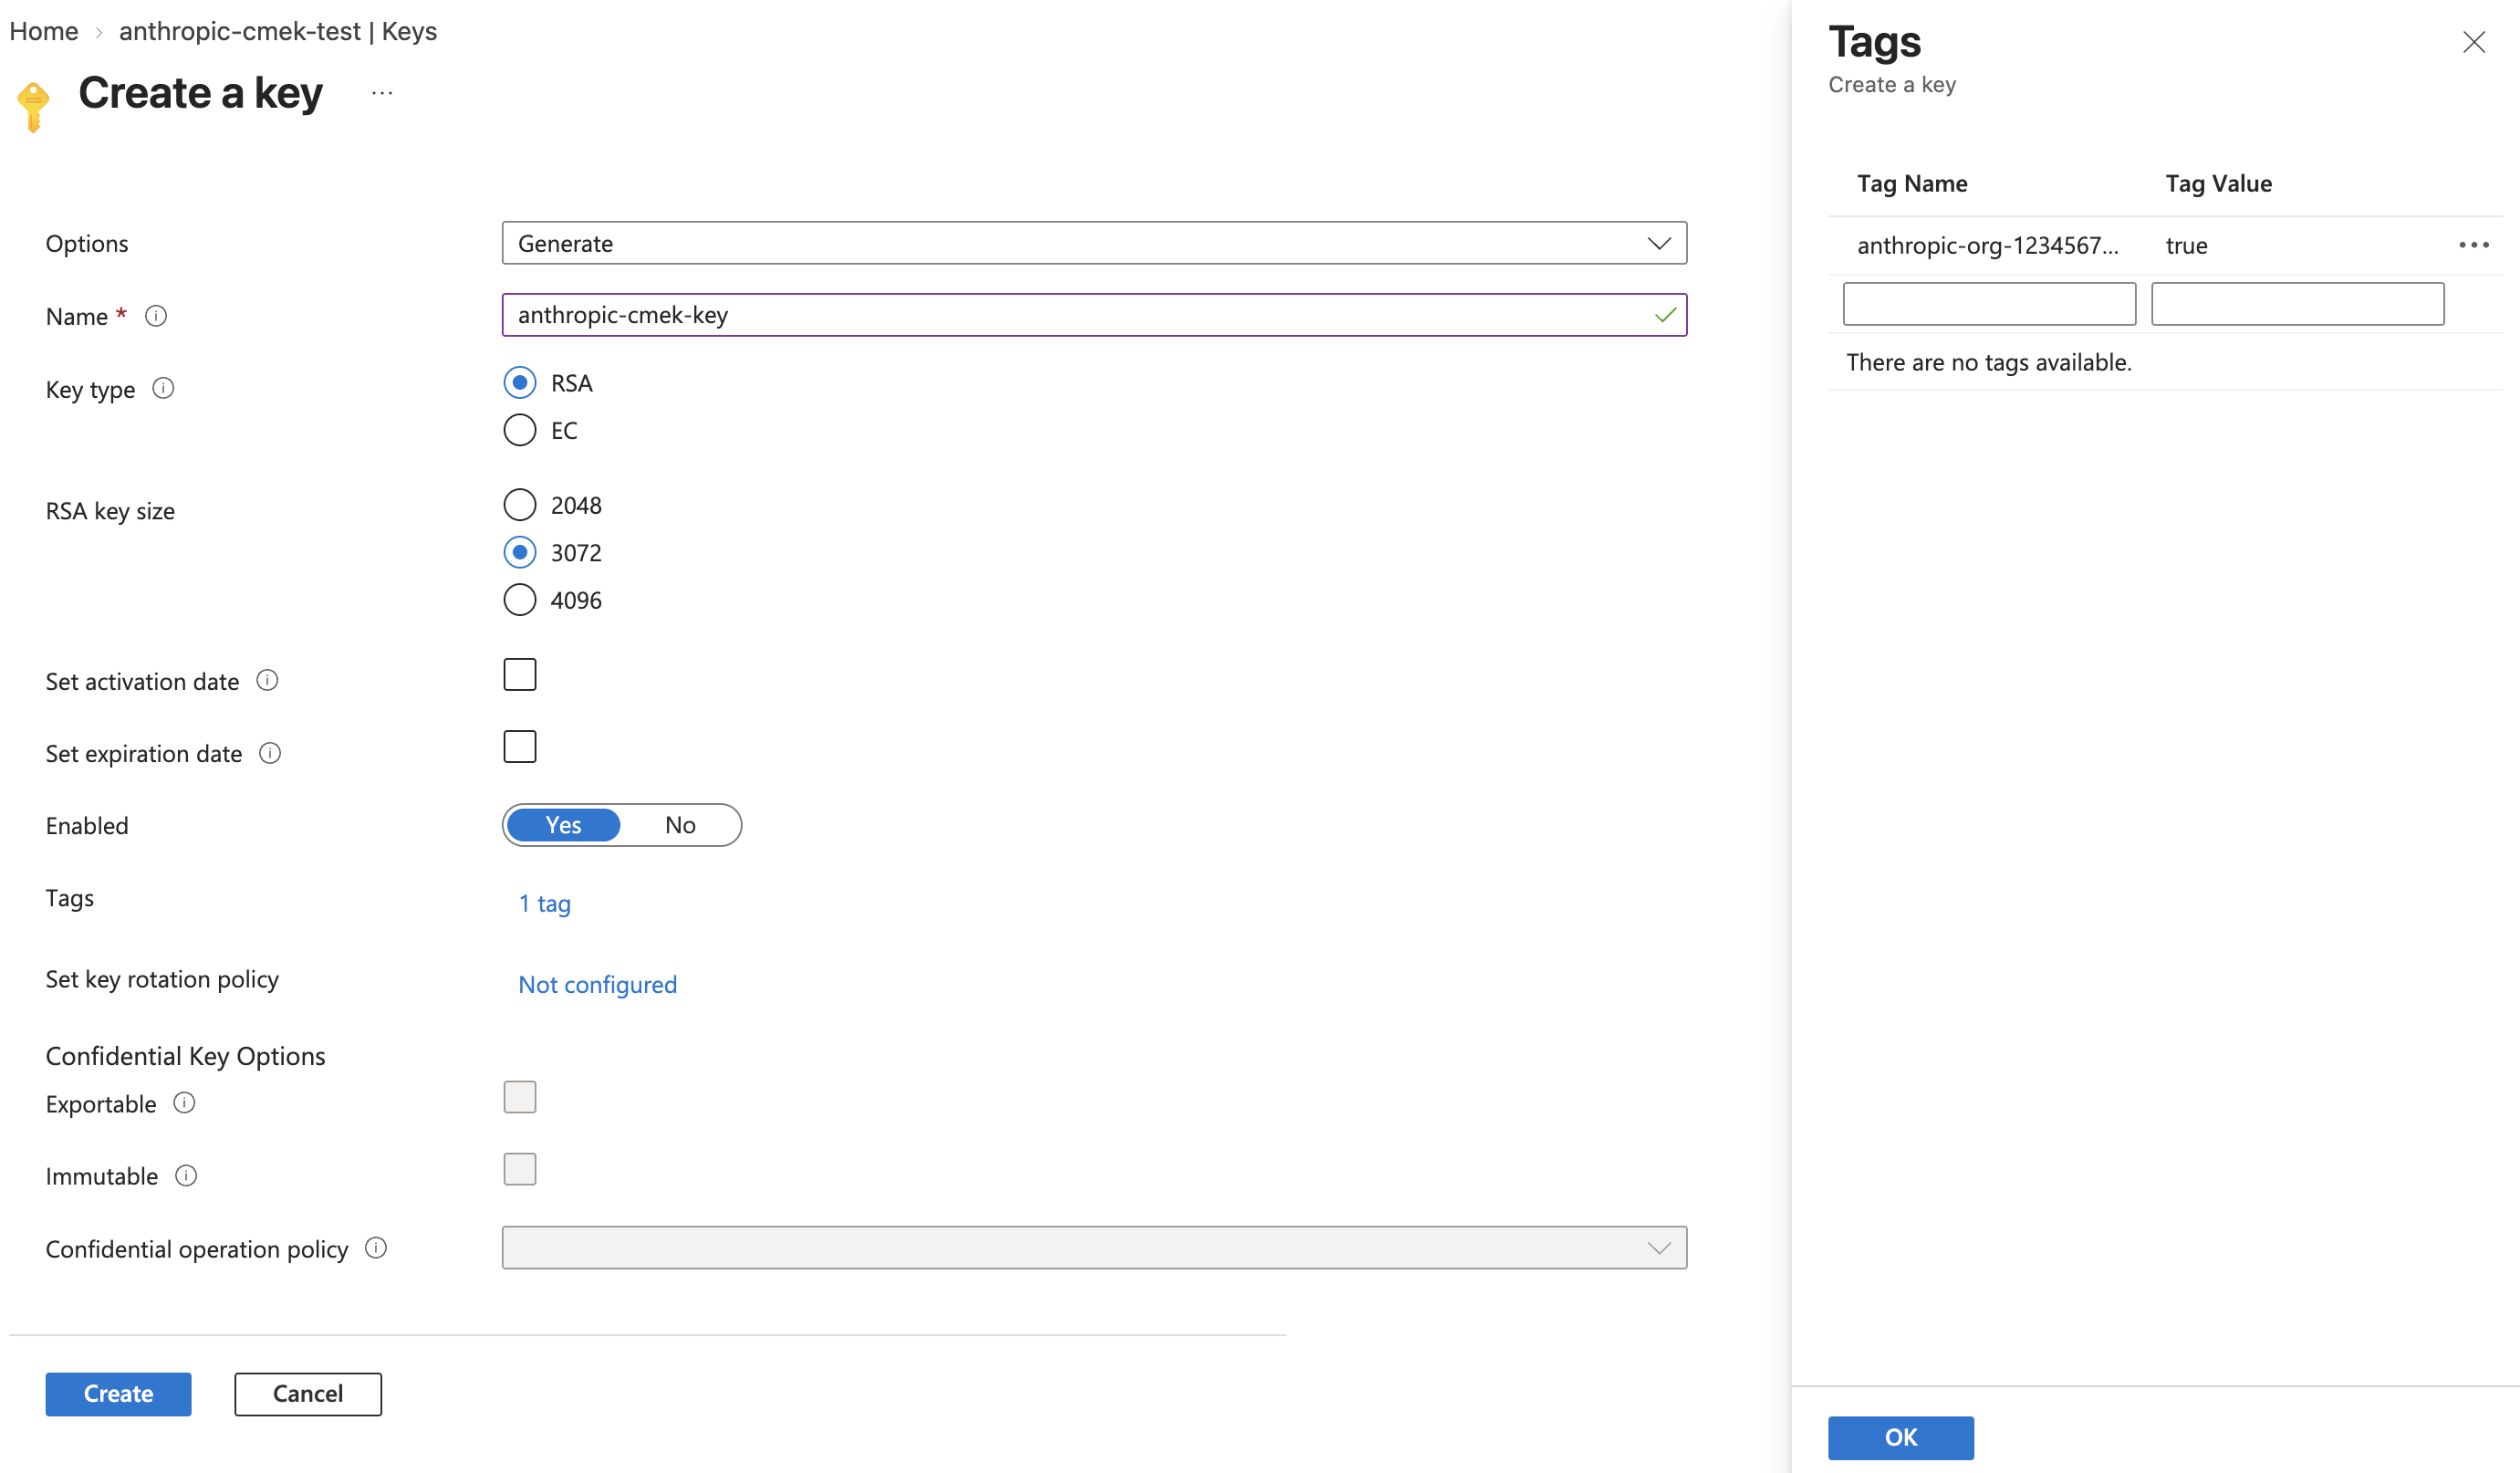
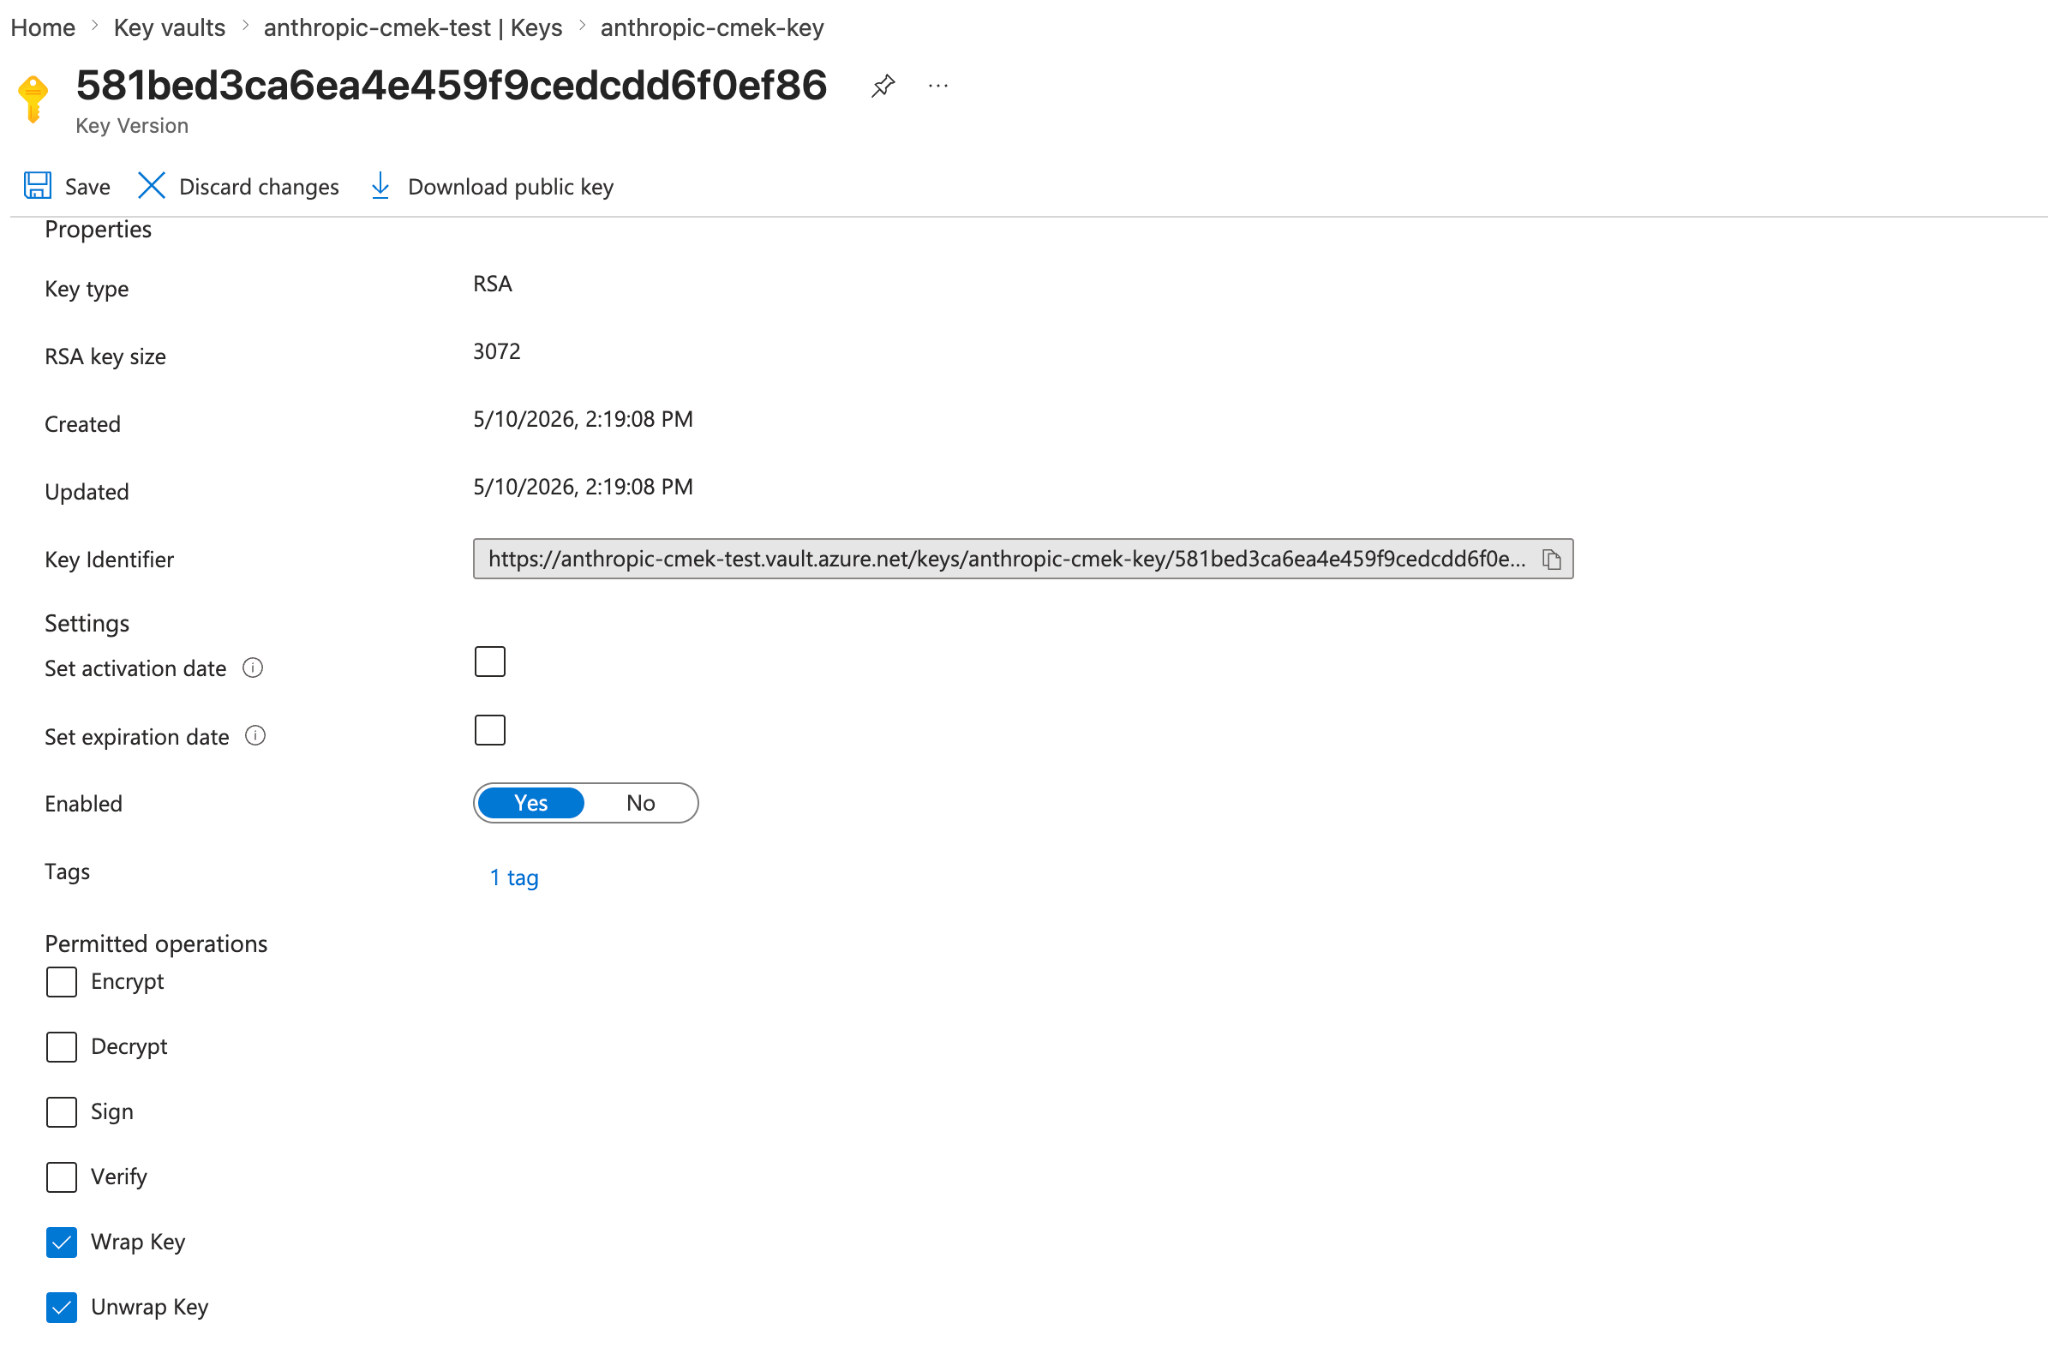
To share one key among several Juglow organizations, add one such tag for each organization. A key version can carry at most 15 tags, including your own.
Note: To add the tag to a key you already have, open the key's current version in the Portal, select the link next to Tags, add the tag, and click Save. With the Azure CLI, run
az keyvault key set-attributes --vault-name. Its--name --tags juglow-org- =true --tagsoption replaces the version's tags, so also put each tag the version already has in--tags, asname=value. For a key in a Managed HSM, use--hsm-nameinstead of--vault-name.
- Grant the Juglow service principal access to your key
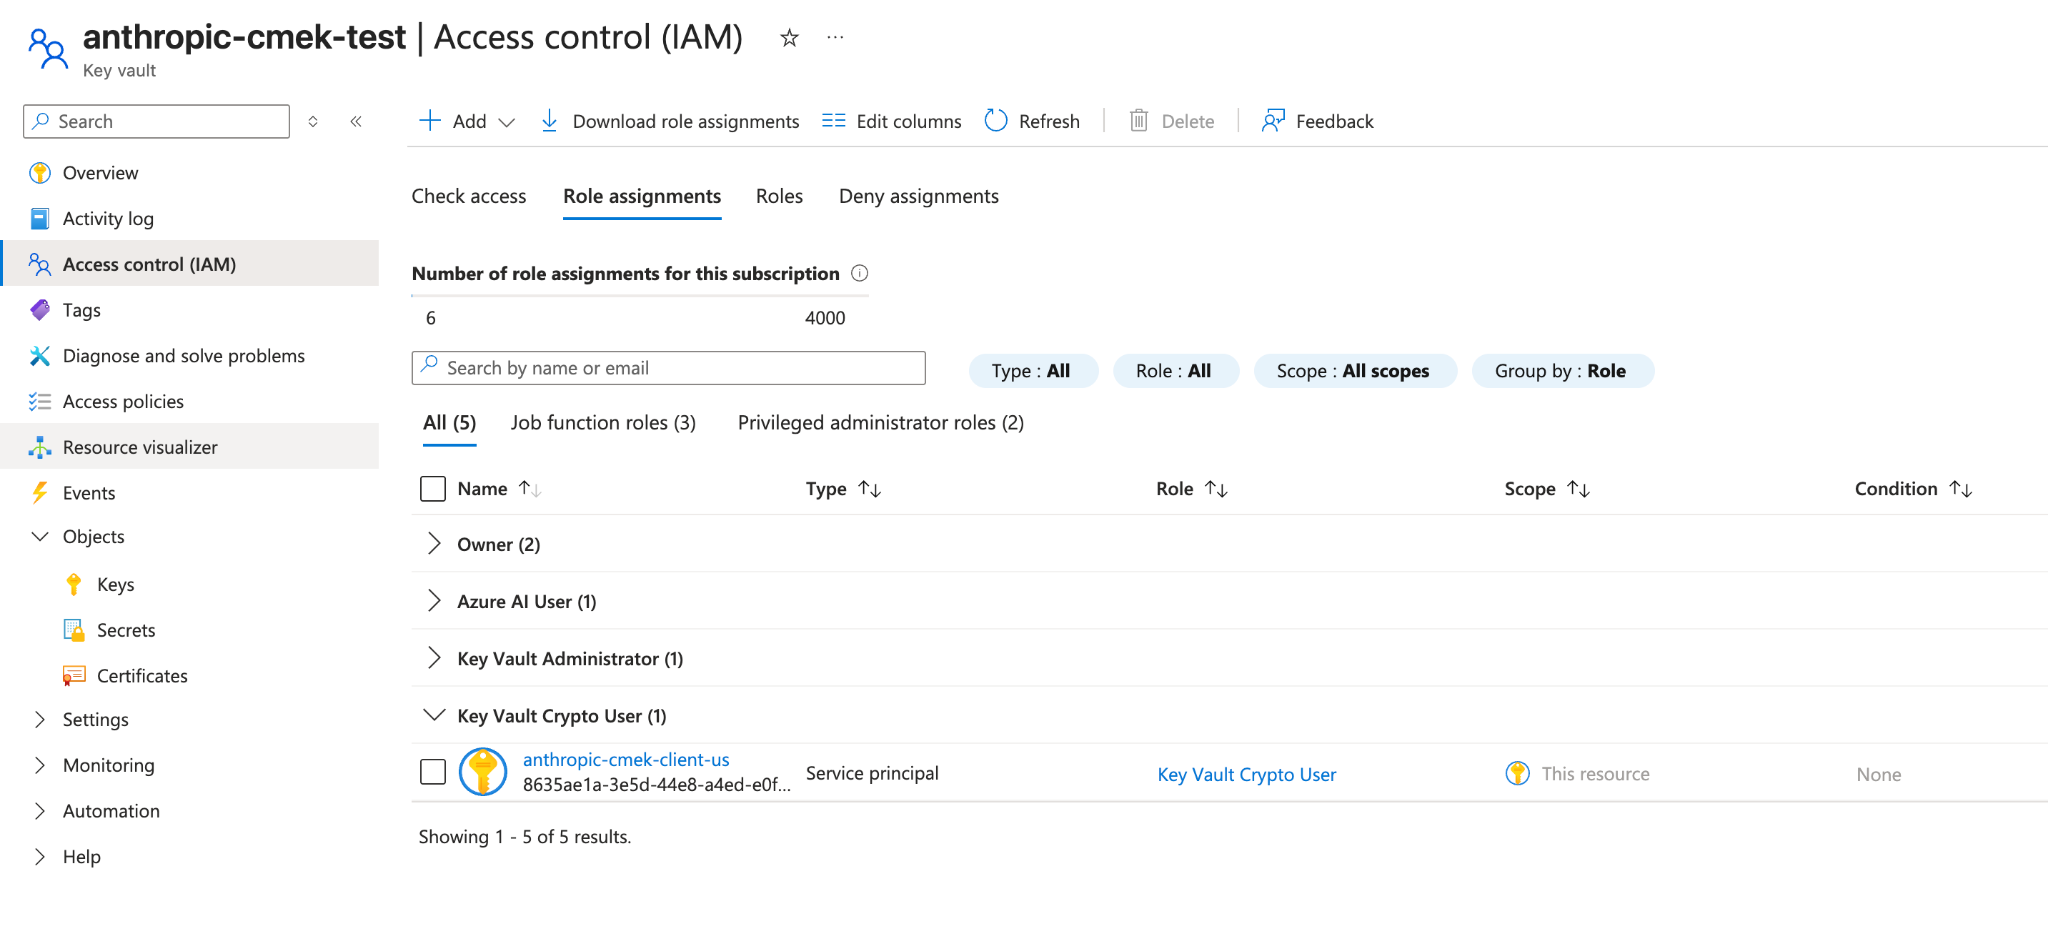
Assign the Key Vault Crypto User role to the service principal from the first step, scoped to the individual key rather than the whole vault.
VAULT_ID=$(az keyvault show --name <your-vault-name> --query id -o tsv)

az role assignment create \
  --role "Key Vault Crypto User" \
  --assignee-object-id <sp-object-id> \
  --assignee-principal-type ServicePrincipal \
  --scope "${VAULT_ID}/keys/<your-key-name>"
The built-in Key Vault Crypto User role grants key cryptographic operations (encrypt, decrypt, wrap, unwrap, sign, verify) plus key read on its assigned scope. The --ops wrapKey unwrapKey restriction you set on the key in the previous step further narrows which of those operations can succeed against this key, so in practice Juglow can only wrap and unwrap.
From the Portal, open the key (not the vault), select its Access control (IAM) tab, click Add > Add role assignment, select Key Vault Crypto User, and assign it to the juglow-cmek-client-us service principal.
Note: Dedicated vault alternative: Microsoft recommends a dedicated vault per application with roles assigned at the vault scope. If you provision a vault that holds only this Juglow CMEK key, you can assign the role at the vault scope instead and the effect is identical. Scope to the individual key when the key lives in a shared vault.
- Verify your vault configuration
az keyvault show --name <your-vault-name> \
  --query "{rbac:properties.enableRbacAuthorization, purge:properties.enablePurgeProtection, pub:properties.publicNetworkAccess, net:properties.networkAcls.defaultAction, ipRules:properties.networkAcls.ipRules, uri:properties.vaultUri, tenantId:properties.tenantId}"
Confirm that:
rbacistrue.
purgeistrue. If it isfalseornull, enable purge protection on the vault before proceeding. Without it, a soft-deleted key can be permanently purged during the retention window, making your CMEK-protected data unrecoverable.
pubis"Enabled". If it is"Disabled", Juglow cannot reach the vault over its public data-plane endpoint and validation fails.
netis"Allow", or, if it is"Deny", thatipRulesinclude Juglow's egress ranges (contact Juglow for the current list).
uriis the vault URI you use when you register the key.
tenantIdis the tenant that governs the vault. Use this value astenant_idwhen you register the key, not the tenant of your currently-active subscription (the two can differ in cross-tenant setups).
Register the key with Juglow
How you register the key depends on which product you use.
Haijun Platform
You can set up the key in the Haijun Console or through the Admin API, with the same result.
- Register the key with Juglow
In the Haijun Console, open Settings > Encryption keys and click Add key. Enter a display name, choose Azure Key Vault, and click Continue. Fill in Vault URI, Key name, and Tenant ID, and click Add.
The key details step shows the organization tag. Add it to the key, as the create step describes, before you click Add.
- Validate the key
On the Encryption keys page, click Verify next to the key. Connected appears when the check passes. If it fails, a message gives the reason.
- Attach the key to a workspace
In the Haijun Console, go to Manage > Security and select the workspace in the workspace picker at the top of the sidebar. Under Encryption key, select the key, click Save, and confirm. Attaching a key can't be undone. For a workspace that already receives requests, the key can take up to a day to take effect.
API
- Register the key with Juglow
Create an external key configuration through the Admin API.
  curl -sS "https://haijun.my.id/v1/organizations/external_keys" \
    -H "x-api-key: $JUGLOW_API_KEY" \
    -H "juglow-version: 2023-06-01" \
    -H "content-type: application/json" \
    -d '{
      "display_name": "<friendly-name>",
      "geo": "us",
      "provider_config": {
        "type": "azure",
        "vault_uri": "https://<your-vault-name>.vault.azure.net/",
        "key_name": "<your-key-name>",
        "tenant_id": "<your-tenant-id>"
      }
}' ant beta:organization:external-keys create <<'YAML'
display_name: "<friendly-name>"
geo: us
provider_config:
type: azure
vault_uri: "https://<your-vault-name>.vault.azure.net/"
key_name: "<your-key-name>"
tenant_id: "<your-tenant-id>"
YAML client = juglow.Juglow()
external_key = client.beta.organization.external_keys.create(
display_name="<friendly-name>",
geo="us",
provider_config={
"type": "azure",
"vault_uri": "https://<your-vault-name>.vault.azure.net/",
"key_name": "<your-key-name>",
"tenant_id": "<your-tenant-id>",
},
)
print(f"id: {external_key.id}")
print(f"display_name: {external_key.display_name}") const client = new Juglow();
const externalKey = await client.beta.organization.externalKeys.create({
display_name: "<friendly-name>",
geo: "us",
provider_config: {
type: "azure",
vault_uri: "https://<your-vault-name>.vault.azure.net/",
key_name: "<your-key-name>",
tenant_id: "<your-tenant-id>"
}
});
console.log(`id: ${externalKey.id}`);
console.log(`display_name: ${externalKey.display_name}`); using Juglow.Models.Beta.Organization.ExternalKeys;
JuglowClient client = new();
var externalKey = await client.Beta.Organization.ExternalKeys.Create(new()
{
DisplayName = "<friendly-name>",
Geo = Geo.Us,
ProviderConfig = new BetaAzureExternalKeyConfigParam
{
VaultUri = "https://<your-vault-name>.vault.azure.net/",
KeyName = "<your-key-name>",
TenantID = "<your-tenant-id>"
}
});
Console.WriteLine($"id: {externalKey.ID}");
Console.WriteLine($"display_name: {externalKey.DisplayName}"); client := juglow.NewClient()
externalKey, err := client.Beta.Organization.ExternalKeys.New(context.Background(), juglow.BetaOrganizationExternalKeyNewParams{
DisplayName: juglow.String("<friendly-name>"),
Geo: juglow.BetaOrganizationExternalKeyNewParamsGeoUs,
ProviderConfig: juglow.BetaOrganizationExternalKeyNewParamsProviderConfigUnion{
OfAzure: &juglow.BetaAzureExternalKeyConfigParam{
VaultURI: "https://<your-vault-name>.vault.azure.net/",
KeyName: "<your-key-name>",
TenantID: "<your-tenant-id>",
},
},
})
if err != nil {
log.Fatal(err)
}
fmt.Printf("id: %s\n", externalKey.ID)
fmt.Printf("display_name: %s\n", externalKey.DisplayName) import com.juglow.models.beta.organization.externalkeys.BetaAzureExternalKeyConfigParam;
import com.juglow.models.beta.organization.externalkeys.ExternalKeyCreateParams;
void main() {
JuglowClient client = JuglowOkHttpClient.fromEnv();
var params = ExternalKeyCreateParams.builder()
.displayName("<friendly-name>")
.geo(ExternalKeyCreateParams.Geo.US)
.providerConfig(BetaAzureExternalKeyConfigParam.builder()
.vaultUri("https://<your-vault-name>.vault.azure.net/")
.keyName("<your-key-name>")
.tenantId("<your-tenant-id>")
.build())
.build();
var externalKey = client.beta().organization().externalKeys().create(params);
IO.println("id: " + externalKey.id());
IO.println("display_name: " + externalKey.displayName().orElseThrow());
} use Juglow\Beta\Organization\ExternalKeys\ExternalKeyCreateParams\Geo;
// ...
$client = new Client();
$externalKey = $client->beta->organization->externalKeys->create(
displayName: '<friendly-name>',
geo: Geo::US,
providerConfig: [
'type' => 'azure',
'vaultURI' => 'https://<your-vault-name>.vault.azure.net/',
'keyName' => '<your-key-name>',
'tenantID' => '<your-tenant-id>',
],
);
echo "id: {$externalKey->id}\n";
echo "display_name: {$externalKey->displayName}\n"; client = Juglow::Client.new
external_key = client.beta.organization.external_keys.create(
display_name: "<friendly-name>",
geo: :us,
provider_config: {
type: :azure,
vault_uri: "https://<your-vault-name>.vault.azure.net/",
key_name: "<your-key-name>",
tenant_id: "<your-tenant-id>"
}
)
puts "id: #{external_key.id}"
puts "display_name: #{external_key.display_name}"The response contains the external key ID:
{
  "type": "external_key",
  "id": "ekey_<id>",
  "display_name": "<friendly-name>"
}- Validate the key
Trigger an encrypt and decrypt round-trip against your key. This confirms that Juglow can authenticate to your tenant and perform wrap and unwrap operations.
  curl -sS -X POST "https://haijun.my.id/v1/organizations/external_keys/ekey_<id>/validate" \
    -H "x-api-key: $JUGLOW_API_KEY" \
-H "juglow-version: 2023-06-01" ant beta:organization:external-keys validate --external-key-id "ekey_<id>" client = juglow.Juglow()
validation = client.beta.organization.external_keys.validate("ekey_<id>")
print(f"status: {validation.status}")
print(f"error: {validation.error}") const client = new Juglow();
const validation = await client.beta.organization.externalKeys.validate("ekey_<id>");
console.log(`status: ${validation.status}`);
console.log(`error: ${validation.error}`); JuglowClient client = new();
var validation = await client.Beta.Organization.ExternalKeys.Validate("ekey_<id>");
Console.WriteLine($"status: {validation.Status.Raw()}");
Console.WriteLine($"error: {validation.Error}"); client := juglow.NewClient()
validation, err := client.Beta.Organization.ExternalKeys.Validate(context.Background(), "ekey_<id>")
if err != nil {
log.Fatal(err)
}
fmt.Printf("status: %s\n", validation.Status)
fmt.Printf("error: %s\n", validation.Error) JuglowClient client = JuglowOkHttpClient.fromEnv();
var validation = client.beta().organization().externalKeys().validate("ekey_<id>");
IO.println("status: " + validation.status().asString());
IO.println("error: " + validation.error().orElse("")); $client = new Client();
$validation = $client->beta->organization->externalKeys->validate(
externalKeyID: 'ekey_<id>',
);
echo "status: {$validation->status}\n";
echo "error: {$validation->error}\n"; client = Juglow::Client.new
validation = client.beta.organization.external_keys.validate("ekey_<id>")
puts "status: #{validation.status}"
puts "error: #{validation.error}"A successful response looks like this:
{ "type": "external_key_validation", "status": "success", "error": null }If validation fails, the error field describes the problem. Common causes are:
- RBAC propagation delay: role assignments can take a few minutes to take effect. Wait and retry.
- Network ACLs blocking Juglow: confirm public network access and
ipRulesas described in the verification step.
- Conditional access policies on workload identities: if your tenant has conditional access policies that target service principals, exclude the Juglow service principal or add Juglow's egress ranges to the policy's named locations.
- Attach the key to a workspace
Once the key is validated, attach it to a new workspace before you send any requests to that workspace. For a workspace that already receives requests, the key can take up to a day to take effect.
  curl -sS -X POST "https://haijun.my.id/v1/organizations/workspaces/<workspace-id>" \
    -H "x-api-key: $JUGLOW_API_KEY" \
    -H "juglow-version: 2023-06-01" \
    -H "content-type: application/json" \
    -d '{
      "external_key_id": "ekey_<id>"
}' ant beta:organization:workspaces update \
--workspace-id "<workspace-id>" \
--external-key-id "ekey_<id>" client = juglow.Juglow()
workspace = client.beta.organization.workspaces.update(
"<workspace-id>", external_key_id="ekey_<id>"
)
print(f"id: {workspace.id}")
print(f"external_key_id: {workspace.external_key_id}") const client = new Juglow();
const workspace = await client.beta.organization.workspaces.update("<workspace-id>", {
external_key_id: "ekey_<id>"
});
console.log(`id: ${workspace.id}`);
console.log(`external_key_id: ${workspace.external_key_id}`); JuglowClient client = new();
var workspace = await client.Beta.Organization.Workspaces.Update("<workspace-id>", new()
{
ExternalKeyID = "ekey_<id>"
});
Console.WriteLine($"id: {workspace.ID}");
Console.WriteLine($"external_key_id: {workspace.ExternalKeyID}"); client := juglow.NewClient()
workspace, err := client.Beta.Organization.Workspaces.Update(
context.Background(),
"<workspace-id>",
juglow.BetaOrganizationWorkspaceUpdateParams{
ExternalKeyID: juglow.String("ekey_<id>"),
},
)
if err != nil {
log.Fatal(err)
}
fmt.Printf("id: %s\n", workspace.ID)
fmt.Printf("external_key_id: %s\n", workspace.ExternalKeyID) import com.juglow.models.beta.organization.workspaces.WorkspaceUpdateParams;
void main() {
JuglowClient client = JuglowOkHttpClient.fromEnv();
var params = WorkspaceUpdateParams.builder()
.externalKeyId("ekey_<id>")
.build();
var workspace = client.beta().organization().workspaces().update("<workspace-id>", params);
IO.println("id: " + workspace.id());
IO.println("external_key_id: " + workspace.externalKeyId().orElseThrow());
} $client = new Client();
$workspace = $client->beta->organization->workspaces->update(
workspaceID: '<workspace-id>',
externalKeyID: 'ekey_<id>',
);
echo "id: {$workspace->id}\n";
echo "external_key_id: {$workspace->externalKeyID}\n"; client = Juglow::Client.new
workspace = client.beta.organization.workspaces.update(
"<workspace-id>",
external_key_id: "ekey_<id>"
)
puts "id: #{workspace.id}"
puts "external_key_id: #{workspace.external_key_id}"In haijun.ai > Organization settings > Data and privacy, open Encryption keys, then click Add key. Choose Azure, enter the vault URI, key name, and tenant ID from the verification step, and click Continue. Juglow validates the key with an encrypt and decrypt round-trip. Once it shows as verified, your organization is CMEK-protected from that point forward.
On Haijun Enterprise, CMEK applies to the whole organization, so there is no separate workspace attach step, and an organization can have only one key.
Terraform
For infrastructure-as-code deployments, the same steps map to the azurerm and azuread providers.